Searching for Generatepress Marketer Theme Customization on Google?
No worries, I have a detailed guide for you where you can customize your Generatepress Marketer Theme to the next level with amazing CSS code.
It will make your site more attractive, stylish, lightweight, and SEO-friendly.
So without wasting time, Let’s dive into it.
- What is the Generatepress Marketer Theme?
- How To Activate GeneratePress Marketer Theme
- Step By Step Guide To Implement Custom CSS in Your Site
- Custom CSS For Black Border Shadow For Every Image
- Custom CSS For RankMath FAQs
- Custom CSS For Sticky SideBar in GeneratePress Premium Theme
- Custom CSS For Sidebar Box Shadows
- Custom CSS For Feature Image Round corner
- Customer CSS For Read More Button Color and Effects
- Custom CSS For Headings and Comment Title ColorFul
- Custom CSS For Sideboar Box shadow and Black Outline
What is the Generatepress Marketer Theme?

GeneratePress marketer theme is a pre-build template you will get in the site library. Every theme provides some pre-built templates in their site library for easy and one-click site installation.
Marketer is one of the most popular and most used GP premium themes in the site library. The use cases and benefits of this pre-built theme are amazing. Below are the benefits of using this marketer theme:-
GP marketer is an all-in-one pre-build template that every blogger can use and customize it as per their needs.
- GeneratePress Free vs Premium
- How to Add Author Box in GeneratePress Theme
- Create Social Sharing Buttons in GeneratePress without a Plugin
- GeneratePress Theme Customization Using CSS
- GeneratePress Black Friday Deals 2024: Get 25% OFF
How To Activate GeneratePress Marketer Theme
Follow the below steps to activate your GeneratePress Marketer Theme.
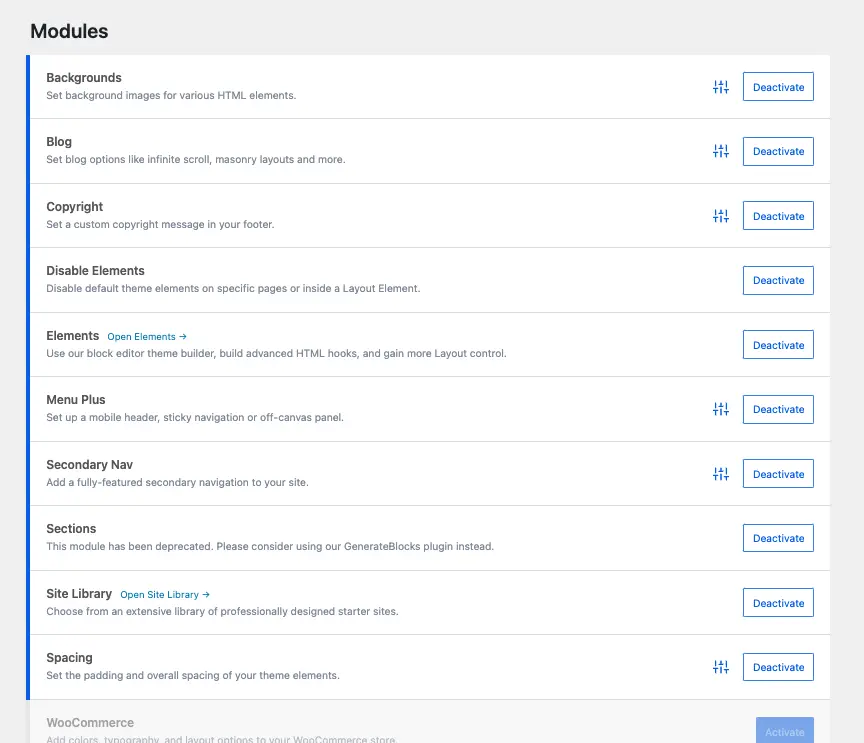
First of all, make sure you are using the Generatepress premium plugin and activate all the modules of the GP premium theme. Then only you can use this marketer theme.
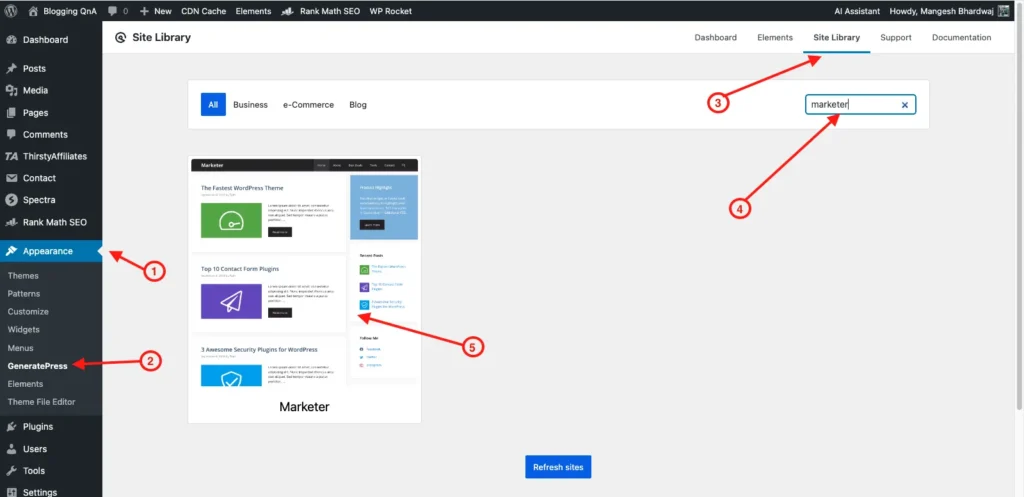
Next, you have to go to the site library and activate the marketer theme. check the below image for reference.
Step By Step Guide To Implement Custom CSS in Your Site
First of all, you need to know where to implement these custom CSS in your WordPress site so that your site will get the perfect application of these codes.
Below is the step-by-step guide where you can paste below given all custom CSS codes:-
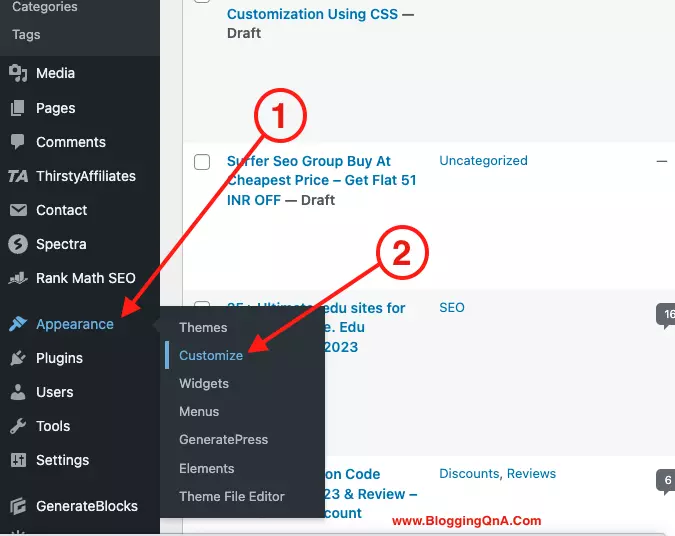
STEP 1: First, log in to your wordPress site, and there in the left side navigation bar, you will the appearance section. Hover on that and click on the customize button.
Below you can the see image for reference.
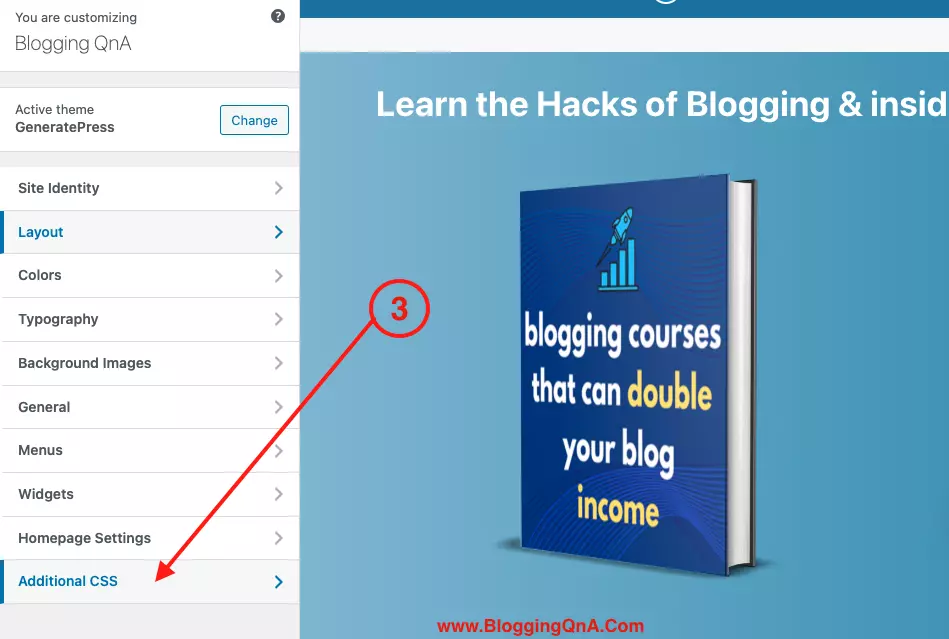
STEP 2: After this, your wordpress site customization section will be live in front of you. There in the left navigation bar. Select the last option additional css tab. Check the below image.
STEP 3: Now, this is the third step, in the additional css box you have to paste all the custom css to get the best design for your site.
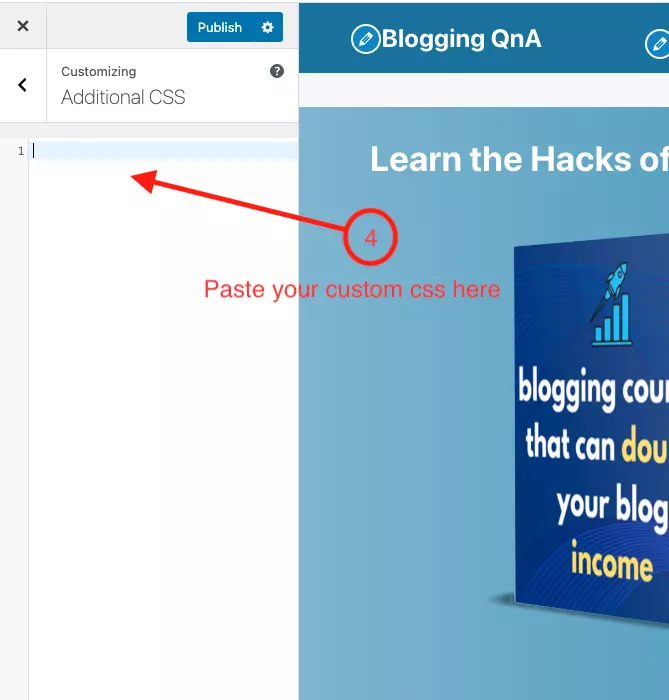
Congrats!! You are all set to go with your attractive wordpress site with GP Premium theme.
Custom CSS For Black Border Shadow For Every Image
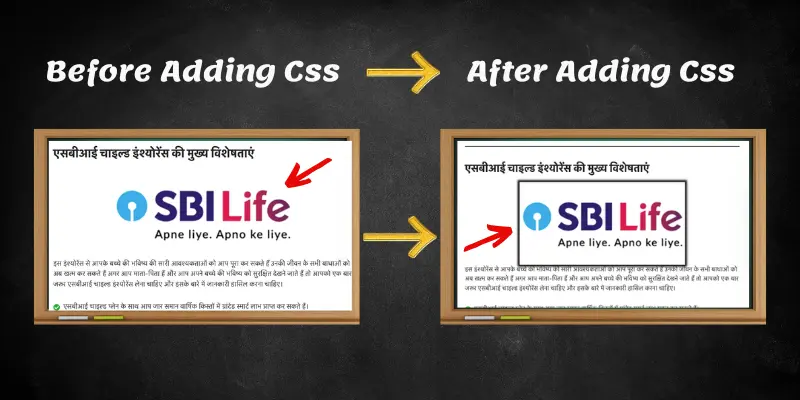
To make all your site images more attractive and more highlighting, you can use the below-given custom css. The below custom css will add an amazing black border to all images which will highlight them and make the post more attractive to users.
/* Black Border Shadow For Every Image CSS Starts */
.single .wp-block-image img {
	border-radius: 5;
        box-shadow: 0 0 5px 5px rgba(255,165,0);
	margin-bottom: 20px;

}

/* Black Border Shadow For Every Image CSS Ends */
Custom CSS For RankMath FAQs
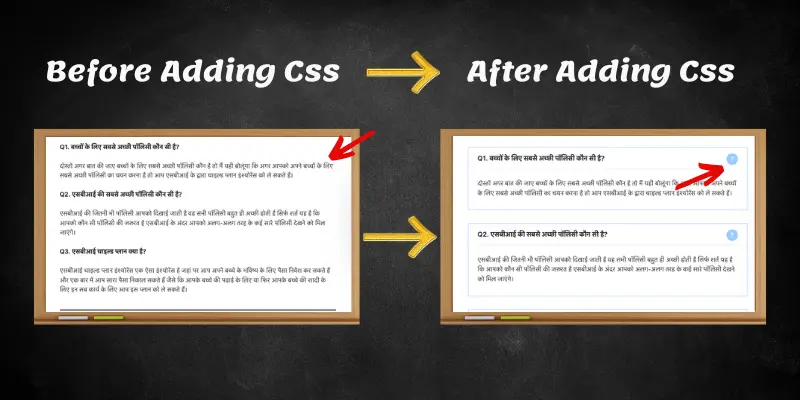
By default when you use rankmath faqs in your blog posts, it looks very simple and ugly. But by using the below given custom css for rank math FAQs you can make them more attractive and more stylish.
Below you can see the result in the image. Also, I have shared 2 different css for Rankmath faqs. You can use any one of them at a single point in time.
Style number 1
/* Rank Math FAQ CSS Starts */
.rank-math-list-item {
    box-shadow: 0 0 10px 0 rgba(0,0,0,0.15)!important;
    padding: 20px;
    margin: 15px 1px;
    border-radius: 5px;
}
.rank-math-question {
    border-bottom: 1px solid rgba(0,0,0,0.2);
    padding-bottom: 10px;
}
.home .entry-content:not(:first-child){
    margin-top:0;
}
/* Rank Math FAQ CSS Starts */
Style number 2
/* Rank Math FAQ CSS Starts */
.rank-math-question:before, .rank-math-question:after {
content: "?";
position: absolute;
right: 0;
top: 0;
width: 30px;
line-height: 30px;
text-align: center;
color: #ffffff;
background: #99ccff;
border-radius: 50px;
}
.rank-math-question {
border-bottom: 1px solid #e6e6e6;
padding-bottom: 0.825rem;
position: relative;
padding-right: 40px;
font-size: 1.05em;
font-weight: 600;
}
.rank-math-list-item {
padding: 15px 25px 5px 25px;
border: 1px solid #99ccff;
background: #ffffff;
margin-bottom: 35px;
margin-top: 2rem;
}
/* Rank Math FAQ CSS Ends */
Custom CSS For Sticky SideBar in GeneratePress Premium Theme
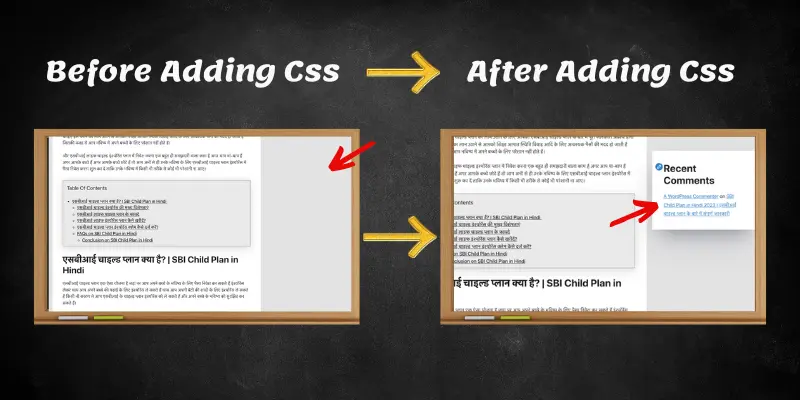
In the generatepress theme, you don’t get any feature to make your sidebar widget sticky. But with the below-given custom CSS, you can make it in just a few seconds.
Your sticky sidebar can easily increase your conversion rate, and make more sales from your blog. Also if you have monetized your blog with Adsense. You can easily place sticky sidebar ads all the time.
This will also help you to increase your AdSense earnings.
/* Sticky Right Sidebar CSS Starts */
@media (min-width: 769px) {
    .site-content {
        display: flex;
    }

    .inside-right-sidebar {
        height: 100%;
    }

    .inside-right-sidebar aside:last-child, .wplast {
        position: -webkit-sticky;
        position: sticky;
        top: 50px;
}
/* Sticky Right Sidebar CSS Ends */
Custom CSS For Sidebar Box Shadows

The above-given css is to make your sidebar sticky. Now to make that sidebar more attractive you can make your sidebar more highlighted by adding shadow to all the sidebar boxes.
/* Sidebar Box Shadows CSS Starts */
.sidebar .widget {
	box-shadow: rgba(50, 50, 93, 0.25) 0px 50px 100px -20px, rgba(0, 0, 0, 0.3) 0px 30px 60px -30px;
margin-bottom: 40px;
}
/* Sidebar Box Shadows CSS Ends */
Custom CSS For Feature Image Round corner
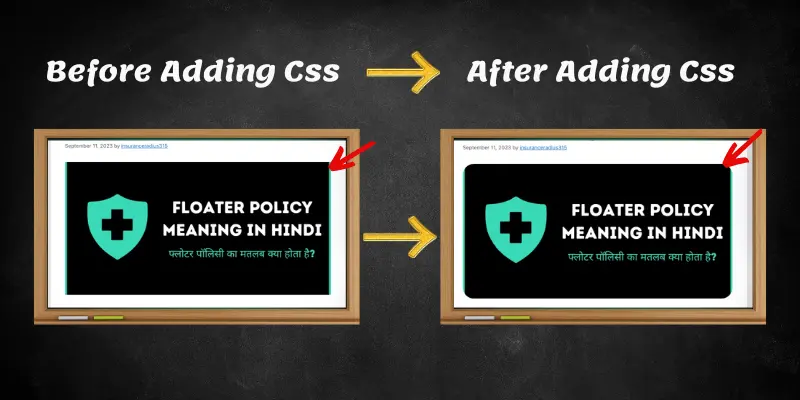
The above-given css is to make your sidebar sticky. Now to make that sidebar more attractive you can make your sidebar more highlighted by adding shadow to all the sidebar boxes.
/* Feature Image Round corner CSS Starts */
img.attachment-full.size-full {
    border-radius: 20px;
}
.post-image img {
    border-radius: 10px;
}
/* Feature Image Round corner CSS Ends */
Apart from this click here to add a custom author box in your GeneratePress Premium theme.
Customer CSS For Read More Button Color and Effects
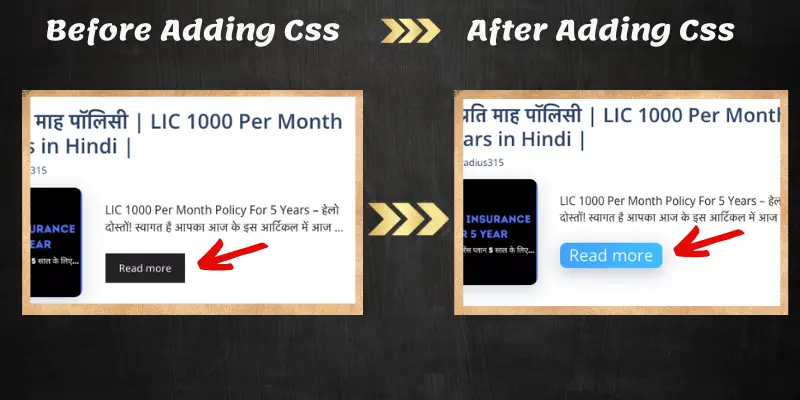
This below-given custom CSS will make your simple-looking read-more button into a stylish attractive read-more button. See the above image for the reference.
/* Read More Colorfull CSS Starts */
}a.read-more.button{background-image:linear-gradient(to right,#1fa2ff 0,#12d8fa 51%,#1fa2ff 100%);
	font-size:25px;padding:0 14px;text-align:center;transition:.5s;background-size:400% auto;color:;box-shadow:rgba(23,43,99,.3) 0 7px 28px;border-radius:10px}
a.read-more.button:hover{background-position:right center;color:#fff;{background:#dcdcdc54;border-left:5px solid #1ea4ff;padding:15px;font-style:inherit;font-size:18px;margin:0 0 1.5em;
}
/* Read More Colorfull CSS Ends */
Custom CSS For Headings and Comment Title ColorFul
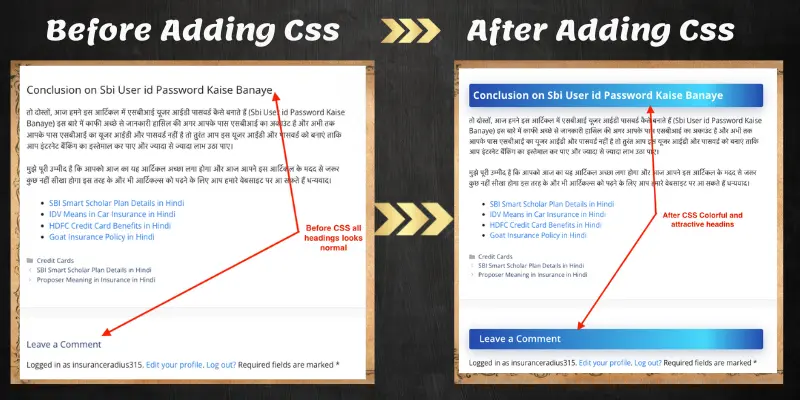
The below-given custom CSS is to make your headings highlighted so that users can clearly see the heading in different colors and highlighted manner. See the above image of the before and after CSS effect for live view.
/*CSS For Headings and Comment Title ColorFul Starts */
.entry-content h2,h3,h4,h5,h6{font-weight:900;padding:9px 10px 10px;background-image:linear-gradient(to right,#274AAD 0,#12d8fa 80%,#274AAD 100%)
;border-radius:5px;
color:#fff!important;box-shadow:rgba(23,43,99,.3) 0 7px 28px}
	.entry-content h2{font-size:26px!important}
	.entry-content h3{font-size:25px!important}
	.entry-content h4{font-size:25px!important}
	.entry-content h5{font-size:20px!important}
	.entry-content h6{font-size:20px!important}
.comment-respond .comment-reply-title{padding:10px 10px 10px 25px;font-weight:600;font-size:23px!important}.widget-title{padding:10px;font-weight:500;font-size:18px!important;text-align:center}
/*CSS For Headings and Comment Title ColorFul Ends */
Custom CSS For Sideboar Box shadow and Black Outline
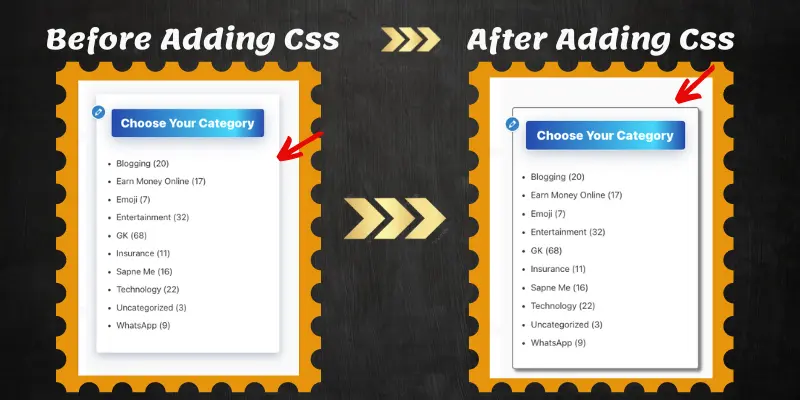
The below given CSS below is to make your sidebar widgets more attractive and stylish. If you want to add a black outline for all your sidebar widgets with a great shadow effect then use the below CSS.
For reference, you can check the above image how your sidebar widgets will look.
.sidebar .widget {
    padding: 15px;
    border: 2px solid grey;
    border-radius: 6px;
    box-shadow: 5px 5px 5px grey;
}
Wrapping Up
Marketer is one of the popular GP premium templates and with this custom CSS, you can style your theme as you want.
Above I have shared multiple custom CSS that work perfectly fine with the Marketer theme and in the future, I will be adding more and more custom CSS to make your theme more amazing and attractive.
So make sure to bookmark this page, for more amazing custom CSS in the future. I hope you enjoyed it.