You must know about WordPress page builders if you work with WordPress. If you haven’t, let me give you a little idea of what a page builder is.
WordPress page builder allows you to easily customize your website even if you don’t know any coding. All elements on the page can be easily dragged and dropped in your desired place. Without knowing any languages like HTML, CSS, bootstrap, javascript, etc., you can make your homepage in your blog.
The Elementor plugin is also somewhat like a WordPress page builder. In the year 2016, Elementor made its debut on the market. It gives a lot of features and a simple interface for its users.
However, there are so many WordPress page builders on the internet. This idea may lead one to wonder why they had to use Elementor in the first place.
Our readers deserve to know all about this amazing developed website builder, so we have decided to inform them about it thoroughly. Since investing in any software or tools, you must fully understand what you are buying.
From features to pricing, we will provide you with every detail in this elementor review.
What is Elementor pro?
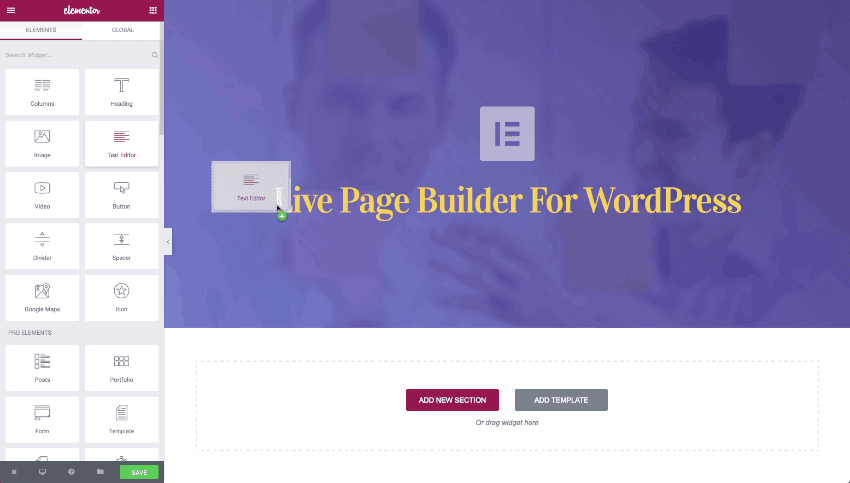
With Elementor, you can rearrange elements on a page using drag and drop. Within a few hours, you can complete your web page designing without using coding.
If you Check my complete homePage and Other Landing pages are designed with Elementor Page Builder. Click here to Get Elementor Pro Now.
Even if you are not comfortable building a web page of your own, you can use the built-in templates. Elementor also allows you to add widgets from the panel present in the extreme left.
Elementor has both free and paid versions. Elementor pro version gives you advanced features to create unique-looking page designs.
So let’s go over some of the elements, benefits, and advantages of Elementor pro in depth.
Installing Elementor
How will you feel if you are all set to test your brand new website builder and you fail to install it?
Ok, I know that it will be frustrating.
That’s why we have come up with the installation process. WordPress plugins are similar to each other, so it’s no problem to install Elementor.
If you have already purchased the pro version, then it is much easier.
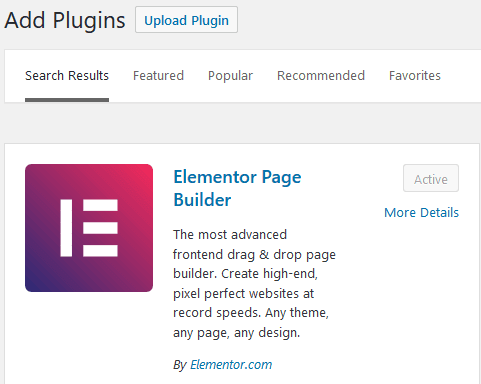
At first, download the ZIP file of Elementor pro. Now go to the plugins section of WordPress. Now click on “ADD PLUGINS” to upload the file. Next, select the ZIP file which you have already downloaded. Click on install. Now give it some time for installation.
When you are installing Elementor pro, make sure to have the accessible version of Elementor already installed. Otherwise, it will not work.
This is because Elementor pro installing is just like adding features and updating the free version.
Understanding UI
Using Elementor is easy and straightforward. Anyone can efficiently work with it. With a simple user interface, you can do everything you need with this plugin. The user interface plays a vital role for users. People enjoy its simplicity because they can easily navigate its widgets and create a webpage.
You can get your desired result by using a simple tool. On the other, if the navigation becomes difficult and time-consuming, people start to avoid that particular tool.
let’s see the reviews of elementor pro by its real users.
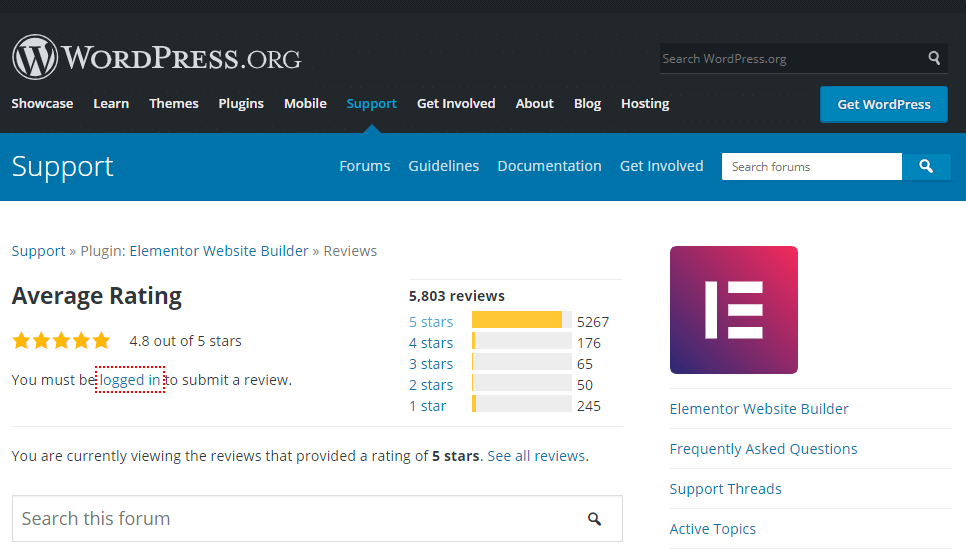
Click here to Read all reviews.
Features of Elementor Pro
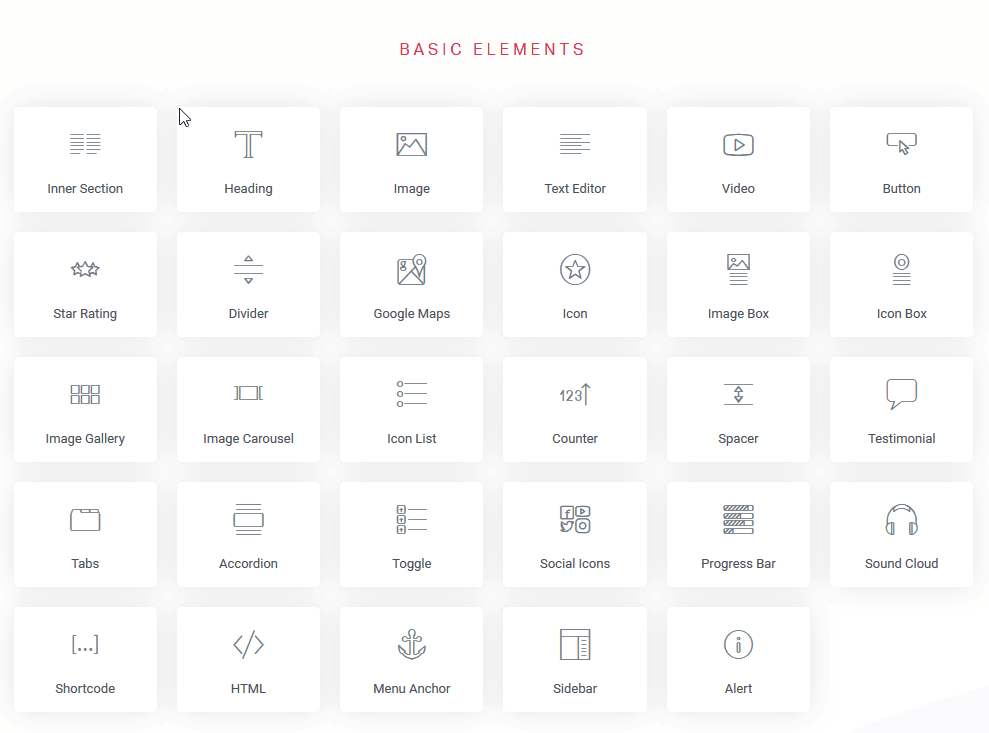
Now let’s look at some of the features of the user interface, which you can use when creating your page.
(1) Finder
When you first use a page builder, it becomes really hard to find the correct elements you are searching for. The whole thing is like clicking here and there and losing hope in the end.
To solve this problem, the Elementor found a way. Elementor has added a feature known as “Finder.” The Finder will help you to instantly find a way to the element you are searching for.
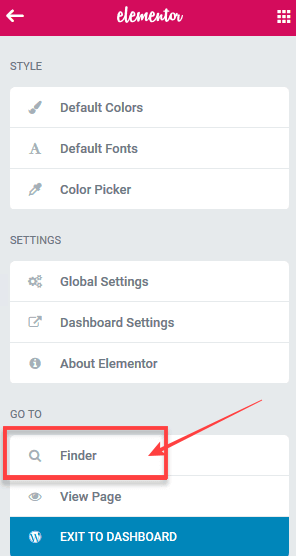
To open Finder, first, go to the Elementor menu. Going down, and in the “Go-To” section, you will get a Finder option.
For the shortcut method, you must tap CTRL+E on windows and CMD+E on MacOS. It will make the FInder instantly pop up in front of your screen.
It would be best if you remembered that Elementor’s Finder tool does not allow you to search for widgets. Instead of that, you can find pop-ups, settings, posts, pages, sections, etc.
We have found that for Finder, we have a shortcut similar to other shortcuts. Tap Ctrl + ? in windows. For Mac persons, please tap CMD+?.
In this way, a list of shortcuts will open in front of you.
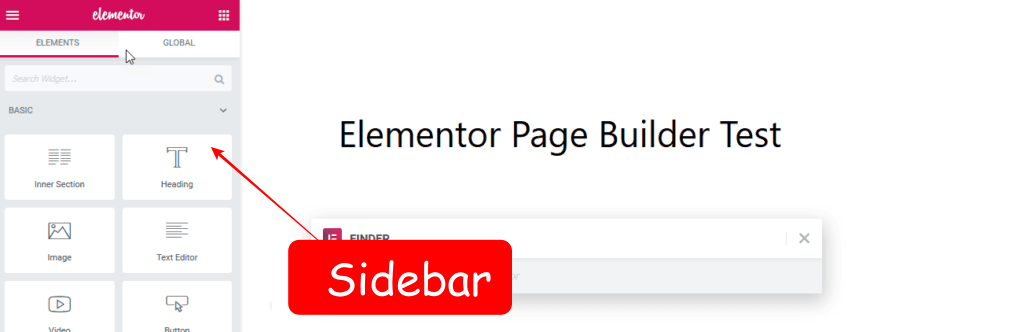
The side panel is an excellent feature in the Elementor. You can adjust the side panel according to your need. Also, the side panel adjustment allows you to have enough space on the screen to customize the web page.
The side panel contains the tools which you will require for drag and drop operation during page building. If you are worried that the adjustment of the side panel will harm its efficiency, then you are absolutely wrong. Without affecting its efficiency, you can either expand or contract the panel.
If you click on a small triangle-like arrow symbol present at the side of the panel, then the side panel will disappear totally. After that, you can easily have a live preview of your page.
This is so handy, and we have to admit that it’s a good feature of Elementor which is not seen in other page-builders. At Least the speed at which it works to preview the page is incomparable.
CTRL+P on windows and CMD+P is the shortcut for a quick live review of the page. In other words, to disappear from the side panel, you can use these shortcuts.
The top-left hamburger menu lets you go to its menu. The rightmost grid icon will redirect you to the library.
(2) Section Navigator
Section navigator allows a user to dodge between various elements of the section quickly. Navigators function much like windows floating on the screen. It gives you the authority to customize and edit any part or component present on the webpage. You can directly get access to the editing by right click on the element.
(3) Layout Options

Elementor provides you with building your layout option like other page builders. However, unlike other page builders, you don’t have to preview the page every time in the new tab. Instead, whenever you edit something, a live preview is displayed on the same page. This makes changing and customizing the layout
easy and handy.
Initially, you will see an option to “Add New Section” in the front area. After that, you will get an option to choose the columns. Elementor page builder also allows you to add more columns. To build a complex design, you can queue up the columns making it look like a stack.
Now what to do if you want to add more properties to it. This is plain and simple. You can easily drag any elements from the side panel or the column menu and drop them on the layout.
For example, to adjust the width of any, first, try to see the element’s border by hovering your mouse pointer over it. Now adjust the width by dragging the edges.
So from the above description, we can conclude that you can adjust your layout and customize it without any difficulties. There’s no doubt that the layout options work well. Especially for beginners, designing a layout became very easy with an Elementor page builder.
(4) Editing & Styling
Elementor got its popularity because of its continuous updates. It releases frequent updates and, in fact, solves significant problems of Elementor users. We discuss its updates because the editing and styling option in the Elementor got some severe issues in the previous version. But in the latest one, it has solved
the issue and added a new feature to improve user experience.
Previously Elementor allows you to customize the elements only by accessing the sidebar. It created a lot of chaos. Users get very irritated to open the sidebar every time and edit it. But in the current version, Elementor enabled the inline editing option too. Now you can easily edit the content without accessing the
sidebar.
For image editing, the Elementor has the option to access the image from the sidebar. Otherwise, it will get difficult for you to observe the changes you’re making in the image constantly. For text editing also the inline editing option is open.
Now, if you want to style your element, you don’t have to change the tab. Instead, on the same tab, click on the style option. You can also navigate to the advance option for other work. So Elementor does not disrupt the workflow of people by providing a wide range of options for editing. Now let’s discuss the styling options too.
Several options exist in the Elementor page builder for styling any element. Like other page builders, the Elementor allows you to change the font size, color, text style, etc. It also provides you the option of underlining words or sentences. In addition, this Elementor offer you changing letter-spacing and line height. Finally, you can also style your text with text shadow.
Elementor has also come up with a new model in which you can style your text with blend modes. In addition, you can adjust the lighting. For example, you can either lighten or darken your text element.
But despite all these facilities, the Elementor is a bit self-obsessed. It has some forced styling methods. When you go to the settings, you can see that it forces some styling options on your layout.
(5) Global Design Options
Generally, web designers and website owners aim to design a layout in a consistent way. But when you are continuously upgrading and adding new content, features, information to your website, maintaining consistency becomes challenging.
Whenever you keep on adding pages after pages, the consistency in the design of the layout keeps on deteriorating. Sometimes for web designers, it would become a big headache when their client wants to make some minor changes after completion.
As a result, Elementor has launched a global design option to overcome this hassle. The global design option provides you a way to style all your pages with the same font, color, and other styles.
Without implementing any coding, you can change the styling across the pages with ease. In addition, you can create a default style for Elementor widgets and plugins. When you create a default style, you don’t have to hassle changing a particular element style.
Go to the site settings from the left side panel. Now under the design system section, you will get the global color and global fonts option. Global color will allow you to set four basic colors for your website. You can also add more colors with the additional color option present at the bottom.
After choosing these colors, you can go to any element styling option. For example, if you click on the globe icon, you get global color options rather than custom colors. After you’ve set your global color preferences, you’ll be able to select a color you want to use.
In a similar way, try to change the text styles. Again, the globe icon will act as a common platform for the style for all your pages.
The global design option includes Theme Style, under which you can set global button style, image style, form fields, and typography. All under one roof. But before applying styling through theme style, make sure to disable the default colors and fonts from the Elementor general settings.
By using the global option, you can save your time. It is possible to avoid the unnecessary inconvenience of messy work. It increases efficiency and will also make your client a happy customer.
(6) Page Templates
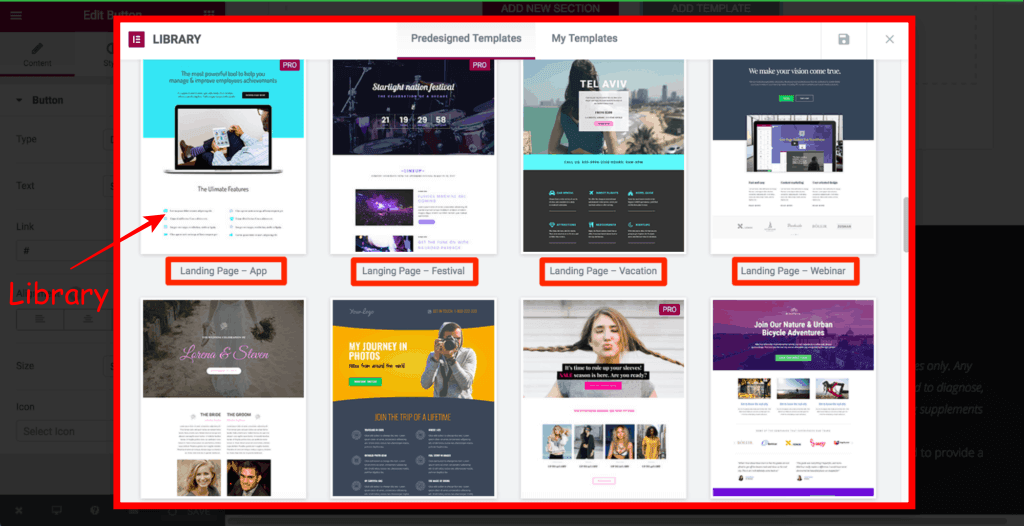
Elementor offers a wide range of pre-made page templates. Pre-made templates help you to get a skeleton for your next page design. Elementor provides 100- 150 page layouts to make your work easy. All these page templates use premium quality images to enhance the user experience.
This is the main question that comes to your mind when it comes to adding page templates. But, first, you have to access the templates library in order to use on- page templates.
To add a new template, first, click on the Add Template option. You will see a pop-up window of the Elementor template library. Here you will get the templates you are looking for. Now to see the preview click on any template. Check out one by one template. While checking if you found a template that fulfills your requirement, click on the “Insert” button.
Now when the page template loads finally you can go on with customizing it. If you like or think that you will need a particular template in the future, you can easily save it.
To save templates, look for a green button at the bottom of the page on the left side. Now click on the “save as template ” button. It will save your page as a template, and you can easily use it for other purposes later.
Elementor is not a good choice for page templates. However, you can use other page builders if you are very much fond of page templates.
(7) Responsiveness
Responsiveness experience is excellent when you are using Elementor as your page builder. The layout of your website adjusts to fit devices and screens of all sizes automatically.
Also, if you want to change the user interface for different devices, you can customize it on your own. First of all, you can check your page layout preview for mobile, tablet, and PC by clicking on the buttons. Later, in the step that follows, you can select a particular device of whose view you wish to alter.
Apply the settings and click on save. Suppose you have changed the setting for a tablet device that does not mean it will change the layout for PC also. The format of PC and mobile will remain as it is.
The most significant advantage of an Elementor is you can see what’s going on with your layout live. Instead of customizing, you can also hide an element. From the advance option on the left side, the panel goes to the responsive section.
Here you will get three options “Hide on Mobile,” “Hide on Tablet,” “Hide on mobile.” By clicking on these, you can hide your elements on any specific device. Not only elements, but you can hide a complete section also. That’s what Elementor provides you as a responsive editing option.
(8) Theme Builder
What will be your approach when you try to embed a certain section across all the pages? Will you do it one by one or do it with some trick? Yes, Elementor provides you a shortcut trick to do it.
Pre-build templates do not provide us with the desired header, footer, archive, etc. In that case, we start to customize it and implement it separately for every page. But when the Elementor is here, why do you fear? Elementor also has the solution to this problem.
Elementor theme builder launched a theme builder, which will help you to solve the problem. It’s an easy process.
On the WordPress dashboard, you have to look for a theme builder option. From here, you will get an “Add New” option. Click on it. Now you have to select a template type. It can be header, footer, archive, single page, search result, etc. There are so many options present.
Elementor will simplify your work by offering pre-built templates for the sections you intend to create. You can modify them later. In addition, you can create your sections. With a few more clicks, you can design your logo as well. Now press the “Publish” button. In the next step, search for “Add condition.” It will help you to communicate with the Elementor.
Suppose you are deploying a footer bar. Add condition option will let the Elementor know that you are constructing a footer. Eventually, the footer bar will get embedded with each and every page you have created.
For mistakes, you can use the “Display Conditions” option. Theme Builder is a powerful feature of Elementor page builder. When you use theme builder, you can freely customize and even save time.
(9) Popup Builder
As the name suggests, Popup builder helps the website designer to build popups without any hassle. But the popup builder feature is only available for subscribers or those who have paid for the pro version of Elementor.
Popups can help you increase sales and convert more visitors. That’s why it’s a very widely used feature for businesspersons. But usually, visitors hate popups. Popups are annoying and lead to irritation for customers.
But the Elementor has come up with a new idea to end this love-hate relation. Elementor popup builder has faced all the drawbacks of a popup and hence became popular among users.
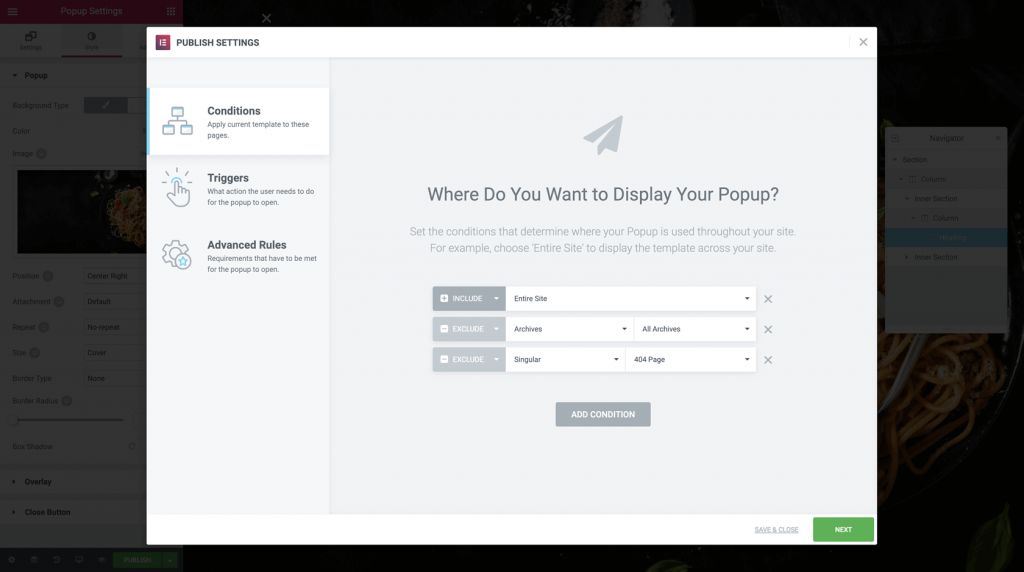
Elementor popup builders will go through these four steps to create a single workflow for designers. First, edit the popup window, next build the content inside the popup, next you can set the rules for targeting and connect the popup with contact forms and site links.
You can complete every step from a single place, and that’s the beauty of the Elementor. Here’s a quick breakdown of the steps involved.
Dashboard > templates > popups > add new popup > select type of template >Name of the template > create template > choose a popup style > insert .
The above steps are for an easy way to insert the pre-built popup window. Otherwise, try to edit the styling of the popup. You can find several options to enable in the advance section. Finally, click on “Publish” when you have finished. Set your popup window behavior with conditions, triggers, and advanced rules under the publish section.
Pricing and Plans of Elementor Pro
When you are all set and experienced with a pro version of Elementor, try for the pro version. This method will allow you to grab the skills to operate Elementor and use it efficiently.
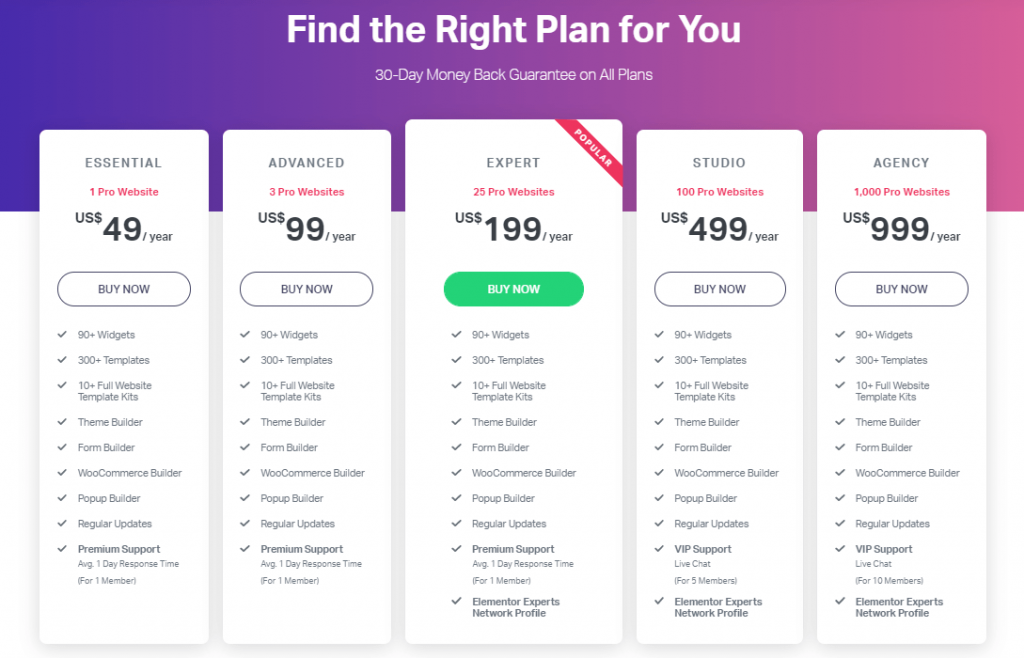
Total five plans are there for the paid version. Every plan has its advantages and properties.
Essential, Expert, and advanced plans are for only one member. The studio plan has five-member limitations. Similarly, the Agency plan is ready for ten members’ usage. All these plans include a 30 days money-back warranty from Elementor.
As we know, Elementor has a paid version known as Elementor Pro. We have mostly covered the born feature of this page builder tool. However, to give you a clear idea, we will further discuss the free version features so that you can easily choose between the two.
What features Elementor free version provides
The free word does not mean that it will cut you off from the important attributes needed for creating a page. You can also design an excellent layout and website without any coding with a free version. The free version of this Elementor page builder provides the following features-
Do you need the Elementor pro version?
Whether you need an Elementor pro version or not solely depends upon you. I am giving two instances so that you can choose easily from those scenarios.
Suppose you are new in the field of WordPress website designing, then better to opt for the free version as you are new in this field, so at first, you need to discover all the basic methods. Then, all you have to do is practice. Once you are done with the free version and a mindset appears to go on in this path, then only
pay for Elementor Pro.
But suppose your main work is designing and developing beautiful websites, landing pages, etc., then you will need a lot more features. In that scenario, you can go for the pro version of Elementor.

What makes it better than other page builders
Elementor is a super easy and handy page builder tool. Its dynamic nature makes it more popular nowadays. From dynamic nature, I mean to say both beginners and professionals can fulfill their requirements while using Elementor.
Best Page Builder in The Market
- A lot of features
- Easy to use and customize
- Beginner friendly
- Mobile friendly
- Professional Customization
- Boost Your Revenue and Sales
FAQs For Elementor Pro
Below are some frequently Asked Questions and Answers for Elementor Pro Plugin.
Q1. What is Elementor?
In short, it is a WordPress Website builder. Using it, you can create stunning websites most conveniently.
Q2. Why is Elementor so popular?
Elementor is constantly working hard to improve their services day by day; that’s why they are the best in the game. Moreover, the tools and widgets they provide can create any advanced website. So It is the best and popular website builder.
Q3. Does Elementor slow down your website?
As Elementor is a heavy website builder, it uses many CSS and HTML to design things. Therefore, the loading time will increase a little bit as it will take time to load all the codes and designs. However, you can fix it with the help of WPRocket.
Q4. Is it worth paying for the pro version?
Don’t hesitate to try the free version if you aren’t sure if you’ll prefer the PRO version. Knowing the free version first will allow you to decide whether the pro version is necessary.
Q5. Is Elementor good for SEO?
Elementor is a website builder; using it, you can create beautiful websites, it won’t affect your website seo.
Final Thought On Elementor Review
At last, all I want to conclude about Elementor is it’s the dream tool that every web designers wish to. No coding, only drag and drop with excellent powerful properties, makes Elementor the best page builder.
Moreover, it’s an open-source tool. Its efficiency and responsiveness are impressive. Hence nowadays,
beginners to masters rely on this product.
Elementor is the best page builder plugin for WordPress. With its drag and drop builder anyone can design good looking website and landing pages. Well written and formatted review is helpful for many people’s.
Indeed Ayush.
Glad you liked it.
hey ,
thank you for write this article for new bloggers like
article best for understanding for new elementor users
thank you so much
i hope you write more article for new blogger
Sir, your all articles and Youtube videos are very helpful.
Thanks for sharing this helpful article.
Hi Mangesh,
Excellent guide. I have no shame that I am a fanboy of elementor, and I am designing 100% of my three sites in elementor. Yes, it makes the site heavy, but it surely makes the web design process faster and smoother.
Regards
Chayan
Sir I have Using Elementor+Addone but it makes my website CLS Too high?
What is the problem??
Sir, Can you tell me, Which Theme You Have used On the BloggingQNA website.